Feb 12, 2025
How to Wash a Motorcycle Helmet: A Guide to Clean Riding
Introduction to Motorcycle Helmet Maintenance
Motorcycle helmets are vital for rider safety. They protect your head during rides and in case of accidents. But just wearing a helmet isn’t enough. Proper maintenance is key to ensure its maximum effectiveness and longevity. Over time, helmets can accumulate dirt, sweat, and oil. This not only affects the helmet’s comfort but also its performance. Learning how to wash a motorcycle helmet is crucial. It helps preserve the helmet’s quality. It also ensures that your helmet remains a clean and hygienic piece of your riding gear. In this guide, we will walk you through the steps to properly clean and care for your motorcycle helmet. Let’s ensure your helmet stays in top condition to keep you safe on the road.
Preparing to Wash Your Helmet
Before you start the process of washing your motorcycle helmet, you’ll need to gather the necessary supplies. Ensure a clean workspace, such as a table or a countertop, where you can lay out all your materials. Here’s what you’ll need:
- Mild soap (a baby shampoo or a dedicated helmet cleaner works well)
- Warm water
- Soft cloths or sponges
- A towel for drying
- A bucket or basin
Once you have all your materials ready, you’ll want to take a moment to inspect your helmet. Look for any damage or wear. A helmet with structural damage should not just be washed, but possibly replaced. Remember, your helmet’s primary job is to protect your head. Any compromise to its integrity means it might not do its job when most needed.
Next, find a comfortable spot to sit. Washing a helmet can take some time, so make sure you’re not rushed.
Also, it’s a good practice to consult your helmet’s manufacturer instructions before you begin. Some helmets may have specific requirements or warnings regarding cleaning methods that could affect warranty or safety.
With your supplies ready and a game plan in place, you’re all set to move on to the first step of actually cleaning your motorcycle helmet, which involves disassembly.
Step 1: Helmet Disassembly
Before diving into how to wash a motorcycle helmet, disassembling it is crucial. Start by removing any electronic devices. These could be communication devices or Bluetooth systems. Move on to take off the visor or face shield. Usually, there are clips or buttons on the sides. Carefully unclick or unscrew them. Feel around the helmet for these parts and gently remove them.
Now, focus on the interior. Remove the inner liner and cheek pads if they are detachable. Most modern helmets have these parts designed for easy removal. Look for snaps, buttons, or Velcro that hold these pieces in place. Pull firmly but gently so you don’t tear them. Once removed, lay all the pieces on a flat surface. Make sure you remember where each part goes. Keeping track will help during reassembly.
Remember not to force any parts that seem stuck. Consult your helmet’s manual for guidance. Using excessive force may damage the parts or compromise the helmet’s safety. If unsure, take a photo before you disassemble. This will serve as a handy reference.
Taking these steps ensures that each part of your motorcycle helmet gets the attention it deserves in the washing process. Laying them out makes it easier to clean every nook and cranny effectively.
Step 2: Cleaning the Outer Shell
Begin by focusing on the helmet’s exterior. Use a soft cloth or sponge dampened with warm, soapy water. Choose a gentle circular motion to clean the outer shell. Avoid harsh chemicals that can damage the helmet’s finish or weaken the material.
Rinse the helmet shell thoroughly using a clean, wet cloth. Make sure all soap is gone. If you encounter stubborn grime, reapply soap and gently scrub. Don’t use abrasive tools. They can scratch or harm the surface.
Dry the outer shell with a soft towel. Pat it down to avoid leaving water spots or streaks. If your helmet has ventilation holes, make sure water hasn’t entered them. If it has, carefully dry these areas with a towel or let them air dry.
Inspect your helmet after cleaning. Make sure no residue or soap is left over. If soap remains, it could irritate your skin the next time you wear the helmet. A clean and shiny outer shell is your goal.
By cleaning the outer shell of your helmet, you prolong its life and maintain its protective qualities. Move to step 3, where we’ll tackle cleaning the internal parts that come into direct contact with your skin.
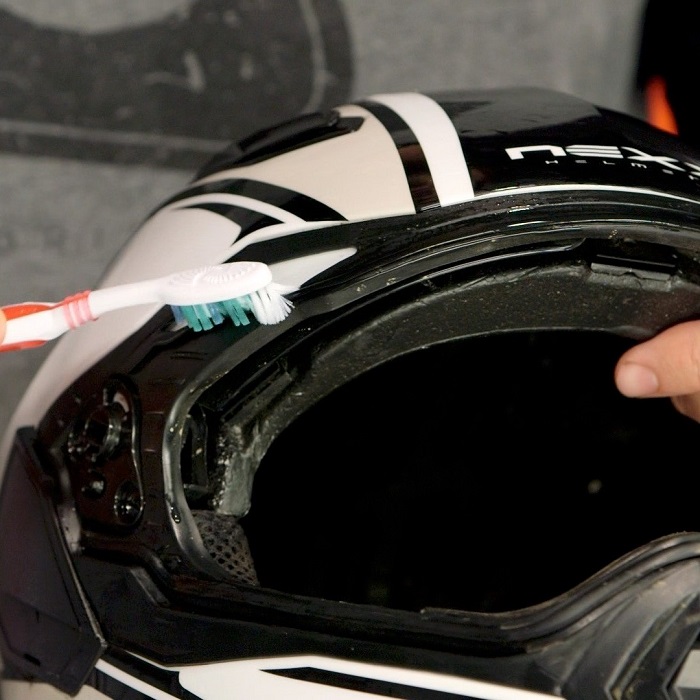
Step 3: Washing the Inner Liner and Cheek Pads
After disassembling the helmet, it’s time to focus on the inner liner and cheek pads. These parts absorb sweat and oil from your skin, making them crucial to wash thoroughly. Start by submerging the liner and pads in warm water mixed with mild soap. Gently hand wash these pieces to remove any dirt and grime. Do not use harsh cleaners or hot water as it may damage the materials.
Swirl them around in the soapy water, then rinse them well with clean water. Make sure all the soap is out. Soap left behind may cause skin irritation or break down the material over time. After rinsing, gently squeeze the water from the liner and pads. Avoid wringing them out. This can cause the material to stretch or tear.
Place the washed liner and cheek pads on a clean towel. Let them air dry completely. Do not use a dryer or expose them to direct sunlight. Heat can warp or shrink the material. Always ensure they are fully dry before reassembling the helmet to prevent mildew or bad odors.
Taking care of the inner liner and cheek pads will not only extend their life but also ensure your comfort and hygiene while wearing the helmet. Move on to the next step once the liner and pads are set aside to dry.
Step 4: Tackling the Visor and Face Shield
After cleaning the helmet’s body, it’s time to care for the visor and face shield. These parts are key for your vision and safety while riding. We will go through the steps to properly clean them.
First, wipe off loose dirt and bugs from the visor with a soft cloth. Next, rinse the visor with warm water. Use mild soap and a soft cloth to gently wash the visor. Be careful to avoid scratches.
For cleaning, do not use household glass cleaners. They might have chemicals that can damage the visor’s material. Instead, stick to water with a mild soap mix.
Rinse the visor well to make sure all soap is off. Soap residue can cause streaking, affecting your vision next time you ride.
Dry the visor with a soft towel by patting it. Avoid rubbing, as it may scratch. Once dry, if you see smudges or streaks, use a microfiber cloth to gently buff the surface.
Now, inspect the visor and face shield. Make sure they’re clear and free of any marks or soap. A clear visor ensures good visibility and rider safety.
When the visor and face shield are clean and dry, set them aside. You’ll reattach them to your helmet once every part is dry. This step is as vital as the others. It ensures you ride with a clear view ahead, key for safe travels.
Step 5: Drying and Reassembling Your Helmet
After washing, it’s crucial to dry every part of your motorcycle helmet properly. Start by placing the inner liner and cheek pads on a dry towel. Position them in a well-ventilated area, away from direct sunlight. Heat from the sun can warp the fabric. Allow enough time for the parts to air-dry completely. Dampness can lead to mildew and unpleasant odors.
Once dry, reassemble the cheek pads and liner back into the helmet. Follow the reverse order from when you disassembled them. Take care to attach all snaps, buttons, or Velcro properly. A secure fit ensures your comfort and safety.
Attach the visor or face shield next. Handle with care to avoid fingerprints or smudges. Check the visor mechanism for smooth operation. Confirm that the shield closes tightly. This helps keep wind and debris out while you ride. Make sure electronics, if any, are reconnected properly.
Go through each piece as you put it back. Ensure everything fits as it should. A well-assembled helmet protects your head well. Before you wrap up, give your helmet a final inspection. Look for any missed spots that might need a touch-up. Your helmet is now clean, dry, and ready for your next ride.
In this guide on how to wash a motorcycle helmet, we have covered each step in detail. From prepping and disassembly to cleaning and drying. We also included how to reassemble the helmet correctly. Clean gear is safe gear. Take the time to maintain your helmet. It will serve you well, ride after ride.
Tips for Regular Motorcycle Helmet Care
Keeping your motorcycle helmet in top condition requires regular care beyond just washing. Here are some tips to help you maintain your helmet:
- Wipe it down after use: Use a soft cloth to remove any dirt or bugs after each ride.
- Check for damage: Frequently inspect for cracks, loose padding, or other signs of wear.
- Store it properly: Place your helmet in a cool, dry area away from direct sunlight to prevent damage.
- Keep it dry: If your helmet gets wet inside, remove the pads and liner and let them air dry.
- Handle with care: Always be gentle when putting on or taking off your helmet to avoid interior damage.
- Avoid harsh chemicals: Use only mild soap for cleaning to preserve the helmet’s materials.
- Regularly refresh the anti-fog coating: If your visor has one, follow manufacturer’s instructions for upkeep.
- Replace after an accident: If you’ve been in a crash, replace your helmet, even if no damage is visible.
- Follow the manufacturer’s guidelines: Consult the care instructions that came with your helmet for specific advice.
By following these simple steps, you can ensure your motorcycle helmet stays clean and functional, offering the best protection every time you ride. Remember, a well-maintained helmet is a critical component of safe riding.
Conclusion: The Importance of a Clean Helmet
Maintaining a clean motorcycle helmet is vital for rider safety and hygiene. Throughout this guide on how to wash a motorcycle helmet, we’ve shown that a clean helmet is more than just about looking good. Here are the key takeaways:
- Safety: A clean helmet means clear visibility through the visor, ensuring safer rides. Dirt and smudges can impair your vision, thus cleaning maintains essential sightlines.
- Longevity: Regular cleaning extends the helmet’s life. Sweat and oils, if not washed out, deteriorate the helmet’s inner materials over time. Proper care prevents this wear and tear.
- Comfort: A fresh helmet feels better to wear. Itches and irritation can come from built-up grime, so a good clean keeps the helmet comfortable.
- Hygiene: Regular washing eliminates bacteria and odors. This makes every ride more pleasant, keeping your gear smelling fresh.
- Performance: A well-maintained helmet performs to its max capability. Debris and residues can affect the helmet’s aerodynamics and weight, impacting your riding.
Prioritize helmet cleanliness as part of your riding routine. By following the steps outlined, your helmet remains a reliable part of your safety gear. Remember to inspect it often, handle it with care, and wash it regularly. Your commitment to helmet maintenance pays off with each ride. Keep it clean, and enjoy the journey ahead with confidence.
More Details