Aug 1, 2024
How do I know what chain to buy for my motorcycle?

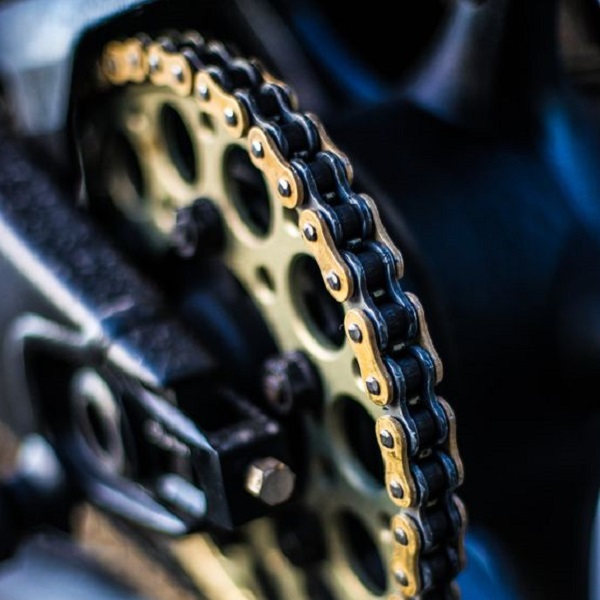
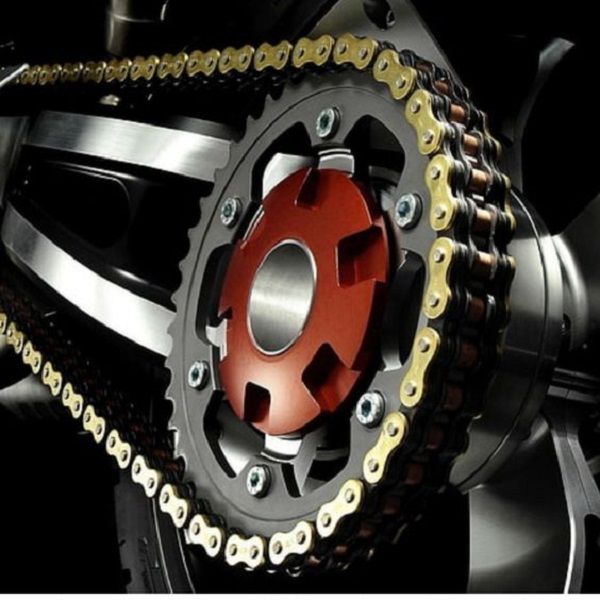
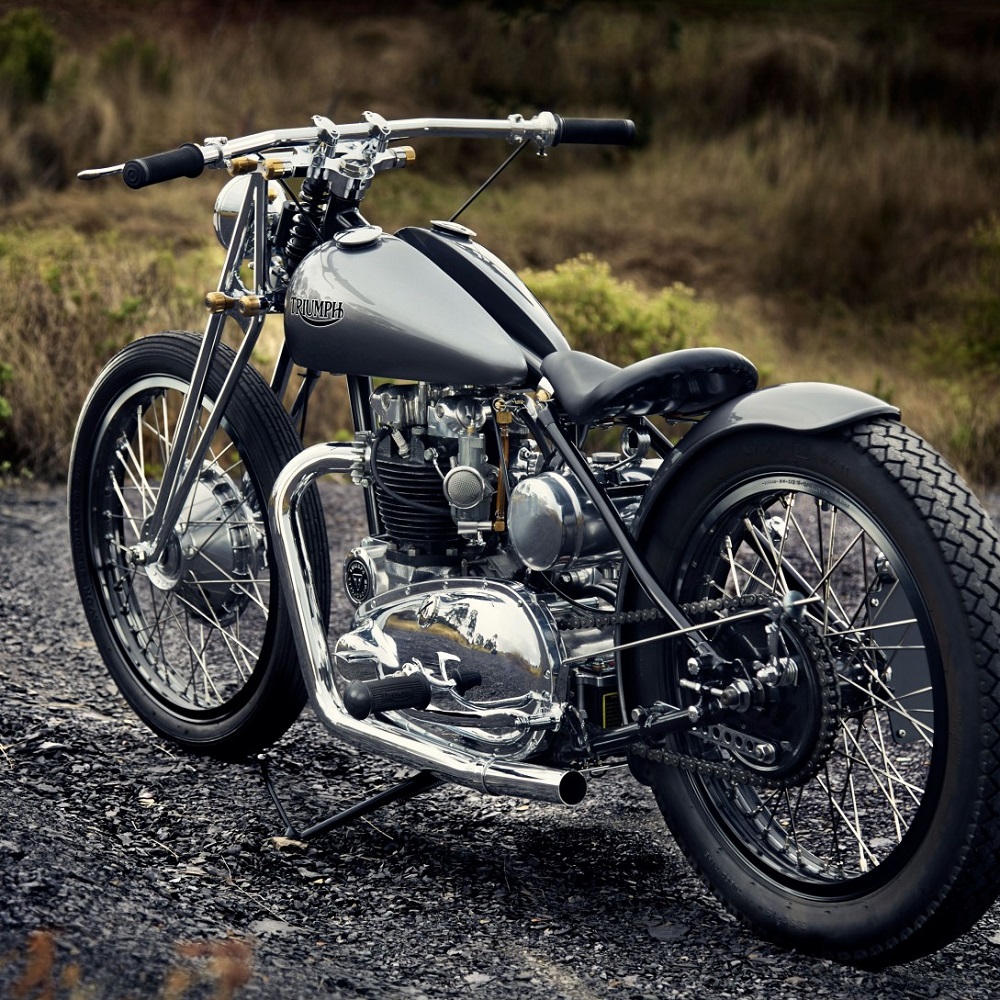
Your motorcycle’s chain is a critical component, transferring power from the engine to the rear wheel. A well-maintained chain ensures smooth acceleration, efficient power delivery, and a safe riding experience. However, with a variety of chain types and sizes available, selecting the right one can be daunting. How do I know what chain to buy for my motorcycle? This guide will equip you with the knowledge needed to make an informed decision and keep your motorcycle running smoothly.

Understanding Motorcycle Chains

Before diving into specifics, it’s important to understand the basic components of a motorcycle chain:

  • Links: These interlocking pieces form the chain’s structure.
  • Pins: Cylindrical components connecting the links.
  • Rollers: Cylindrical components that engage with the sprockets.
  • Plates: Side plates hold the pins and rollers together.

Types of Motorcycle Chains

  1. Standard Roller Chain: The most basic type, suitable for low-power motorcycles and scooters.
  2. O-Ring Chain: Features O-rings between the plates to retain lubrication and reduce friction.
  3. X-Ring Chain: Similar to O-ring chains, but with X-shaped rings for improved sealing and durability.
  4. Z-Ring Chain: A newer design with Z-shaped rings, offering even better sealing than X-ring chains.

Decoding Chain Sizes

Motorcycle chains are identified by a series of numbers, typically in the format “520,” “525,” or “530.” These numbers represent:

  • Pitch: The distance between the centers of two adjacent pins.
  • Width: The inner width of the roller.
  • Tensile Strength: The maximum load the chain can withstand before breaking.

Higher numbers generally indicate a stronger, heavier-duty chain.

Matching the Chain to Your Motorcycle

To select the right chain, you’ll need to consider several factors:

Motorcycle Model

Your motorcycle’s owner’s manual will specify the recommended chain size and type.

Engine Displacement

Larger engines require stronger chains to handle the increased power.

Riding Style

Aggressive riding styles may necessitate a more durable chain.

Budget

Chain prices vary depending on type and brand.

The most reliable source for determining the correct chain size is your motorcycle’s owner’s manual. It will provide the exact specifications you need.

Numerous online tools and resources can help you identify the correct chain based on your motorcycle’s make, model, and year.

Chain Length: Getting the Right Fit

In addition to chain size, you’ll need to determine the correct length. This depends on the number of teeth on your sprockets and the distance between them.

Counting Links

One way to measure chain length is to count the number of links on your old chain.

Using a Chain Length Calculator

Online calculators can help you determine the correct length based on your sprocket sizes and swingarm length.

Choosing the right motorcycle chain

Additional Considerations

  • Brand Reputation: Choose a reputable brand known for producing high-quality chains.
  • Maintenance: Regular cleaning and lubrication are essential for maximizing chain life.
  • Professional Installation: If you’re not comfortable installing a chain yourself, have a qualified mechanic do it for you.

Choosing the right chain for your motorcycle is crucial for optimal performance, safety, and longevity. By understanding the different types of chains, decoding chain sizes, and considering your motorcycle’s specific needs, you can make an informed decision and ensure your ride is always in top condition.

Chain Wear and Replacement

Understanding chain wear and knowing when to replace your chain is vital for safety and performance. Here are some signs your chain needs attention:

  • Tight Spots: If you feel tight spots when rotating the rear wheel with the motorcycle on a stand, it indicates uneven chain wear.
  • Excessive Slack: Too much slack in the chain can lead to derailment or premature wear. Consult your owner’s manual for proper slack adjustment.
  • Rust or Corrosion: Rust and corrosion weaken the chain and can lead to failure.
  • Stiff Links: Stiff links that don’t move freely indicate worn-out pins and bushings.

Use a chain wear tool to accurately measure chain elongation. If the elongation exceeds the manufacturer’s recommended limit, it’s time for a new chain.

Chain Maintenance: Extending Lifespan

Proper chain maintenance is essential for maximizing its lifespan and performance. Here are some key steps:

  • Regular Cleaning: Clean your chain regularly with a dedicated chain cleaner or kerosene to remove dirt, grime, and old lubricant.
  • Lubrication: Apply a high-quality chain lubricant after cleaning to reduce friction and protect against wear.
  • Adjusting Slack: Check and adjust chain slack according to your owner’s manual recommendations.
  • Inspecting for Damage: Regularly inspect the chain for any signs of damage, such as cracked or worn-out links, and replace them promptly.

Choosing the right motorcycle chain

Chain Cleaning Tips

Use a soft brush and avoid harsh chemicals that can damage the O-rings or X-rings. Clean the chain when it’s warm, as the lubricant will be more fluid and easier to remove.  

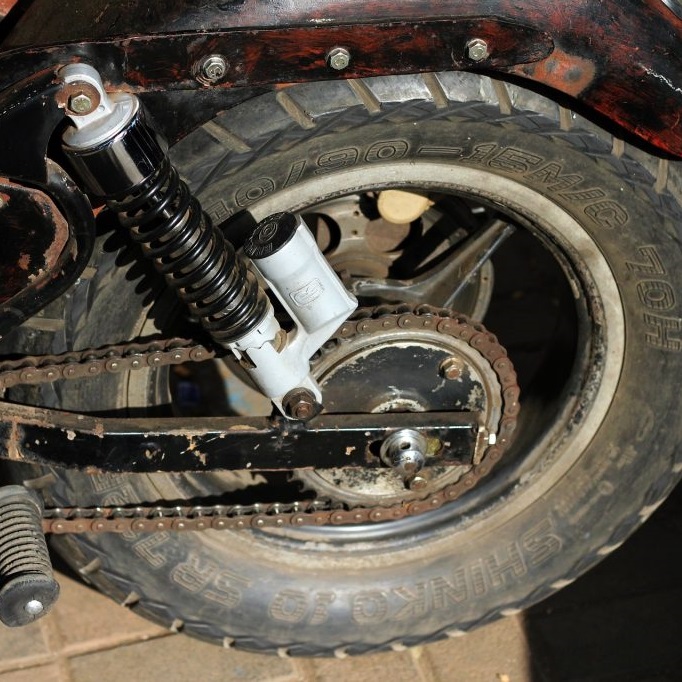
When installing a new chain, you’ll need to connect the ends. You have two options: 

  • Master Link (Clip-Type): Easier to install and remove, but may require more frequent checks for security.
  • Rivet Link: More permanent and secure, but requires special tools for installation.

Choose the option that best suits your comfort level and maintenance preferences.

Safety First: Prioritize Chain Maintenance

A worn-out or damaged chain can snap while riding, leading to loss of control and potentially serious accidents. Prioritize regular chain maintenance to ensure your safety and the longevity of your motorcycle.

Choosing the right chain and maintaining it properly are essential aspects of motorcycle ownership. By following this guide, you’ll be well-equipped to select a chain that matches your bike and riding style, ensuring optimal performance, safety, and enjoyment on the open road. Remember, a well-maintained chain is a happy chain, and a happy chain means a happy rider.

Additional Tips:

  • Consider upgrading to a higher-quality chain if you frequently ride in harsh conditions or engage in aggressive riding.
  • Replace your sprockets along with your chain for optimal performance.  

Safety Tips for Chain Maintenance

  • Wear Gloves: Protect your hands from grime and potential injuries.
  • Secure the Motorcycle: Ensure your motorcycle is stable on a stand or lift before working on the chain.
  • Follow Instructions: Consult your owner’s manual for specific instructions on chain maintenance and adjustment.
  • Safety Gear: Always wear appropriate safety gear, including gloves and eye protection.

Upgrading Your Chain: Performance and Longevity

While your motorcycle’s manual provides the standard chain recommendation, you might consider upgrading for several reasons:

  • Performance: Higher-quality chains with O-rings or X-rings offer smoother operation, reduced friction, and improved power transfer.
  • Longevity: Upgraded chains typically last longer, requiring less frequent replacement.
  • Reduced Maintenance: Sealed chains retain lubrication better, reducing the need for frequent cleaning and lubrication.
  • Aesthetics: Some riders prefer the look of gold or colored chains for a personalized touch.

Choosing the right motorcycle chain

Chain Replacement: DIY or Professional?

Replacing a motorcycle chain can be a DIY project for those with mechanical skills and the right tools.

However, if you’re not confident in your abilities, it’s best to have a qualified mechanic handle the job. Improper installation can lead to safety hazards and costly repairs.   

 Tools for Chain Replacement

If you choose to replace the chain yourself, you’ll need the following tools:

  • Chain breaker or chain tool
  • Chain press tool (if using a rivet link)
  • Torque wrench
  • Socket set
  • Chain lubricant

Conclusion

By understanding the intricacies of motorcycle chains and following proper maintenance procedures, you can ensure a safe, enjoyable, and efficient riding experience. Whether you choose a standard chain or opt for an upgrade, remember that regular cleaning, lubrication, and adjustment are key to maximizing the lifespan and performance of this vital component. Your motorcycle will thank you for the care and attention, and you’ll be rewarded with miles of smooth, worry-free riding.

More Details
Jul 30, 2024
Can You Patch a Motorcycle Tire? A Rider’s Guide

Discovering a puncture in your motorcycle tire is never fun. But can you patch it, or is a replacement the only option? The answer isn’t always straightforward. Let’s explore the factors involved in patching motorcycle tires, the potential risks, and when it might be a viable solution.

Understanding Motorcycle Tire Construction: Why Patching is Tricky

Motorcycle tires are designed for high performance, handling, and safety. They’re constructed differently than car tires, with:

Thinner Sidewalls

This allows for greater flexibility but also makes them more vulnerable to damage.

Higher Speeds and Lean Angles

Motorcycles experience greater forces than cars, putting more stress on the tires.

Rider Safety

A tire failure on a motorcycle can have far more serious consequences than on a car.

Patching vs. Plugging: Two Different Approaches

When it comes to repairing a punctured motorcycle tire, there are two main methods:

  • Patching: This involves applying a patch to the inside of the tire to seal the puncture. It’s generally considered a more permanent and reliable solution.
  • Plugging: This involves inserting a rubber plug into the puncture from the outside. It’s a quicker and easier fix, but may not be as durable as a patch.

When is Patching a Motorcycle Tire Safe?

Patching a motorcycle tire can be safe under certain conditions:

  • Puncture Location: The puncture must be in the tread area of the tire, not the sidewall. Sidewall damage compromises the tire’s structural integrity and cannot be safely repaired.
  • Puncture Size: The hole should be small, typically less than 1/4 inch in diameter. Larger punctures may not be effectively sealed with a patch.
  • Tire Condition: The tire should be in good overall condition, with sufficient tread depth and no other signs of damage.
  • Professional Repair: It’s crucial to have the tire patched by a qualified motorcycle mechanic who has experience with tire repairs.

Risks of Patching a Motorcycle Tire: Proceed with Caution

While patching can be a viable option, it’s important to understand the potential risks:

  • Tire Failure: If the patch fails, it could lead to a sudden tire blowout, which can be dangerous at high speeds.
  • Handling Issues: A patched tire may not perform as well as a new tire, potentially affecting handling and stability.
  • Reduced Lifespan: Patching can shorten the lifespan of the tire, as it may not be as durable as a new tire.
  • Liability Concerns: Some repair shops may refuse to patch motorcycle tires due to liability concerns.

patch a motorcycle tire

The Decision to Patch: Weighing the Risks and Benefits

The decision to patch a motorcycle tire is a personal one. Consider the following:

  • Severity of the Puncture: Is it a small hole or a major tear?
  • Tire Condition: Is the tire relatively new or worn out?
  • Your Riding Style: Do you ride aggressively or mostly commute?
  • Your Comfort Level: Are you comfortable riding on a patched tire?

If you’re unsure, consult with a qualified motorcycle mechanic for their professional opinion.

Alternatives to Patching: When Replacement is the Best Option

In some cases, replacing the tire is the safest and most reliable solution:

  • Sidewall Damage: Any damage to the sidewall requires tire replacement.
  • Large Punctures: Holes larger than 1/4 inch are generally not suitable for patching.
  • Multiple Punctures: If your tire has multiple punctures, it’s time for a new one.
  • Old or Worn Tires: If your tires are approaching the end of their lifespan, it’s better to replace them rather than risk a blowout.

Tips for Preventing Flat Tires: Proactive Maintenance

While flat tires can happen to anyone, here are some tips to minimize your risk:

  • Check Tire Pressure Regularly: Properly inflated tires are less prone to punctures.
  • Inspect Tires for Damage: Look for cuts, cracks, or foreign objects embedded in the tread.
  • Avoid Road Hazards: Watch out for potholes, debris, and sharp objects on the road.
  • Rotate Tires Regularly: This helps ensure even wear and extends their lifespan.
  • Replace Tires When Worn: Don’t wait until your tires are bald to replace them.

When it comes to motorcycle tire repairs, safety should always be your top priority. While patching can be a viable option in some cases, it’s crucial to consider the risks and consult with a professional before making a decision. Remember, your tires are your lifeline on the road. Take good care of them, and they’ll take care of you.

DIY Motorcycle Tire Patching: Is It Possible?

While professional patching is recommended, some riders might wonder if they can patch their own motorcycle tires. It’s technically possible, but it’s not advisable for most riders.

  • Complexity: Patching a motorcycle tire requires specific tools, materials, and expertise.
  • Safety Risks: Improper patching can compromise the tire’s integrity, leading to dangerous situations.
  • Liability: If you patch your own tire and it fails, you may be held liable for any resulting accidents or injuries.

Therefore, it’s best to leave tire repairs to the professionals.

patch a motorcycle tire

Temporary Solutions for Motorcycle Tire Punctures: Getting Back on the Road

If you get a flat tire while riding, here are some temporary solutions to get you to safety:

  • Tire Plugs: These are quick and easy to use, but they’re not a permanent solution. Use them only to get to a repair shop for a proper patch or replacement.
  • Tire Sealants: Some tire sealants can temporarily seal small punctures. However, they may not work on larger holes or sidewall damage.
  • Spare Tube: If you have a tube-type tire, carrying a spare tube and tools can allow you to replace the punctured tube on the roadside.

Remember, these are temporary fixes. Always have your tire professionally repaired or replaced as soon as possible.

Motorcycle Tire Warranties: Protecting Your Investment

Some motorcycle tire manufacturers offer warranties that cover repairs or replacements for punctures or defects. Check your tire’s warranty information to see if you’re covered.

  • Road Hazard Warranty: This type of warranty typically covers punctures caused by road hazards like nails or glass.
  • Manufacturer Defects: Some warranties cover defects in the tire’s materials or workmanship.
  • Warranty Limitations: Be sure to read the fine print of your warranty, as there may be limitations or exclusions.

The Cost of Patching vs. Replacing: Weighing Your Options

The cost of patching a motorcycle tire varies depending on the repair shop and the extent of the damage. In general, patching is less expensive than replacing a tire. However, it’s important to factor in the potential risks and reduced lifespan of a patched tire.

  • Patching Cost: Typically ranges from $20 to $50 per tire.
  • Replacement Cost: Can vary widely depending on the tire brand, size, and type, but expect to pay upwards of $100 per tire.

Ultimately, the decision to patch or replace comes down to a balance of cost, safety, and peace of mind.

Educate Yourself: Know Your Tires

Understanding your motorcycle tires is crucial for their maintenance and your safety.

  • Tire Types: Familiarize yourself with the different types of motorcycle tires, such as bias-ply and radial, and their specific characteristics.
  • Tread Patterns: Learn about different tread patterns and how they affect traction, handling, and performance.
  • Tire Pressure: Regularly check and maintain the correct tire pressure for optimal safety and performance.
  • Tire Wear: Inspect your tires for signs of wear and tear, such as uneven tread wear, cracks, or bulges.

patch a motorcycle tire

In Conclusion: Ride Safe, Ride Smart

While patching a motorcycle tire is possible under certain conditions, it’s essential to prioritize your safety and make informed decisions. Consult with a qualified motorcycle mechanic for their professional assessment and recommendations. Remember, regular tire maintenance and inspections are key to preventing flats and ensuring a safe and enjoyable ride.

More Details
Jul 26, 2024
Can You Get Motorcycle Helmets Painted? A Rider’s Guide

Your motorcycle helmet is more than just a safety gear essential. It’s a reflection of your personality and style on the open road. If you’re wondering, “Can you get motorcycle helmets painted?” the answer is a resounding yes!

In this guide, we’ll delve into the world of helmet painting, exploring options, safety considerations, and tips for achieving a unique look.

Why Paint Your Motorcycle Helmet?

There are numerous reasons why riders choose to paint their helmets:

  • Personalization: Express your individuality and create a helmet that’s uniquely yours.
  • Visibility: A brightly colored or custom-painted helmet can enhance your visibility to other motorists.
  • Style: Match your helmet to your bike or riding gear for a cohesive aesthetic.
  • Repair: Cover up scratches or minor damage on an older helmet.
  • Collectible Value: Some custom-painted helmets become valuable collector’s items.

DIY vs. Professional Helmet Painting

You have two main options when it comes to painting your helmet:

  • DIY (Do It Yourself): This is a more affordable option, but it requires time, patience, and artistic skill. You’ll need to research proper techniques, gather materials, and dedicate time to the project.
  • Professional Services: Professional helmet painters specialize in creating custom designs and ensuring a high-quality finish. They often have access to specialized paints and equipment, but their services can be costly.

DIY Tips:

If you’re considering the DIY route, here are a few tips:

  • Research: Learn about different paint types, preparation techniques, and application methods.
  • Practice: Practice your design on a scrap helmet or similar surface before tackling your main helmet.
  • Safety: Prioritize safety by using paints that are designed for helmets and avoid painting over vents or other essential safety features.

Safety Considerations for Painted Helmets

While painting your helmet can be a fun and creative endeavor, it’s crucial to prioritize safety:

Paint Choice

Use paints specifically designed for helmets. These paints are formulated to adhere to the helmet’s surface without compromising its structural integrity.

Avoid Obstructions

Don’t paint over vents, reflective elements, or any other safety features that could impede visibility or ventilation.

Structural Integrity

Be careful not to damage the helmet’s shell or liner during the painting process.

If you’re unsure about any aspect of painting your helmet, consult with a professional helmet painter or a knowledgeable motorcycle shop. They can offer expert advice and ensure your helmet remains safe and functional.

professionally painted motorcycle helmets

Popular Helmet Painting Styles

The possibilities are endless when it comes to helmet painting styles. Here are a few popular options:

  • Airbrushing: This technique allows for intricate details and smooth gradients.
  • Hand-Painted Designs: Hand-painted designs offer a unique, artistic touch.
  • Vinyl Wraps: Vinyl wraps are a less permanent option for adding graphics and designs to your helmet.
  • Custom Graphics: Many professional painters offer custom graphics tailored to your specific preferences.
  • Flames and Pinstriping: Classic hot rod-inspired designs remain popular among riders.

Where to Find Helmet Painting Services

If you decide to go the professional route, here’s where you can find helmet painting services:

  • Specialty Shops: Many motorcycle shops offer helmet painting services.
  • Online Artists: Numerous online artists and studios specialize in custom helmet painting.
  • Local Airbrush Artists: Check with local airbrush artists who may offer helmet painting services.

Painting your motorcycle helmet is a great way to express your individuality, enhance your visibility, and add a touch of style to your riding gear. Whether you choose to DIY or hire a professional, prioritize safety and ensure your helmet remains a protective piece of equipment.

With the right approach, your painted helmet can be a work of art that turns heads on the road.

Caring for Your Painted Helmet

Once you have your beautiful helmet, it’s important to maintain its look and longevity:

  • Cleaning: Gently clean your helmet with a soft, damp cloth and mild soap. Avoid abrasive cleaners or harsh chemicals that could damage the paint.
  • Waxing: Consider applying a coat of wax designed for helmets to protect the paint from UV rays and minor scratches.
  • Storage: Store your helmet in a cool, dry place away from direct sunlight. Avoid stacking heavy objects on top of it, as this could damage the paint.

In most jurisdictions, painting your motorcycle helmet is legal, as long as you don’t obscure any essential safety features. However, it’s always a good idea to check your local laws and regulations to ensure compliance.

Some states or countries may require a certain amount of reflective material on your helmet for visibility. If you’re painting your helmet, ensure you incorporate reflective decals or tape to meet these requirements.

 professionally painted motorcycle helmets

The Cost of Helmet Painting

The cost of painting a motorcycle helmet can vary significantly depending on the complexity of the design, the experience of the painter, and the materials used.

  • DIY: A DIY paint job can be relatively inexpensive, with costs ranging from $50 to $200 depending on the quality of the paint and materials used.
  • Professional: Professional helmet painting can range from a few hundred dollars to several thousand for highly intricate, custom designs.

If you’re on a budget, consider starting with a simple design or trying a DIY paint job. As you gain experience and confidence, you can always upgrade to a more complex design or hire a professional in the future.

Protecting Your Investment

A painted helmet is an investment in your style and safety. Here are some tips to protect your investment:

  • Avoid Scratches: Handle your helmet with care and avoid placing it on rough surfaces.
  • Clean Regularly: Regular cleaning will help prevent dirt and debris from damaging the paint.
  • Store Properly: Store your helmet in a protective bag or box when not in use.
  • Touch-Ups: If your helmet does get scratched, touch up the paint as soon as possible to prevent further damage.

Painting your motorcycle helmet is a fantastic way to personalize your gear and make a statement on the road. Whether you choose to unleash your inner artist with a DIY project or entrust your helmet to a skilled professional, the results can be truly stunning.

Remember, your helmet is an extension of your personality and style, so have fun with it and create a design that reflects who you are as a rider.

professionally painted motorcycle helmets

Inspiring Helmet Paint Designs

Looking for some creative inspiration for your helmet paint job? Here are a few ideas to get you started:

  • Favorite Characters: Showcase your love for pop culture with characters from movies, TV shows, or comic books.
  • Landscapes and Scenery: Depict your favorite landscapes, cityscapes, or natural wonders.
  • Abstract Art: Explore abstract patterns, colors, and textures for a truly unique look.
  • Racing Stripes and Graphics: Channel your inner speed demon with racing-inspired designs.
  • Animal Motifs: Showcase your love for animals with wildlife-themed artwork.
  • Personal Symbols and Quotes: Incorporate meaningful symbols or quotes that resonate with you.

Conclusion

Painting your motorcycle helmet is an exciting way to express yourself, enhance your safety, and create a truly unique piece of gear. Whether you’re a DIY enthusiast or prefer to leave it to the professionals, the possibilities are endless.

Remember, your helmet is a blank canvas waiting to be transformed into a work of art. So, go ahead and unleash your creativity, personalize your helmet, and hit the road with a helmet that reflects your unique personality and passion for riding.

More Details
Jul 19, 2024
How to Clean a Motorcycle Chain: A Step-by-Step Guide

Maintaining a clean motorcycle chain isn’t just about aesthetics; it’s essential for your bike’s performance, efficiency, and longevity. A dirty, neglected chain can lead to premature wear, reduced power transfer, and even safety hazards. Fortunately, cleaning your motorcycle chain is a relatively simple task that can be done at home with the right tools and techniques. Let’s dive into the process and ensure your chain stays in top-notch condition.

Why Regular Chain Cleaning Matters

Before we get into the specifics, let’s explore why regular chain cleaning is so crucial:

Reduced Friction

A clean chain operates with less friction, which translates to smoother power delivery and improved fuel efficiency.

Increased Chain Life

Removing dirt, grime, and old lubricant prevents premature wear, extending the lifespan of your chain and sprockets.

Enhanced Safety

A clean chain is less likely to break or malfunction, ensuring a safer riding experience.

Improved Performance

A well-maintained chain ensures optimal power transfer from your engine to the rear wheel, enhancing your bike’s overall performance.

Tools and Materials You’ll Need

Before you begin, gather the following essentials:

  • Chain Cleaner: You can use a dedicated motorcycle chain cleaner or a readily available alternative like kerosene or diesel fuel.
  • Chain Brush: A brush specifically designed for motorcycle chains will help you reach all the nooks and crannies.
  • Degreaser: A degreaser can help remove stubborn grime and old lubricant.
  • Rags or Towels: These will be used for wiping and drying the chain.
  • Chain Lube: Choose a high-quality chain lubricant that’s appropriate for your riding conditions.
  • Gloves: Protect your hands from dirt and chemicals with a pair of gloves.
  • Optional: A stand or paddock to elevate your motorcycle’s rear wheel can make the cleaning process easier.

Step-by-Step Guide: Cleaning Your Motorcycle Chain

Now, let’s dive into the cleaning process:

  1. Prepare Your Workspace: Find a well-ventilated area and, if possible, elevate your motorcycle’s rear wheel off the ground using a stand or paddock.
  2. Apply Chain Cleaner: Spray or pour chain cleaner generously onto the entire chain, ensuring it reaches all sides of the links and the sprockets.
  3. Let it Soak: Allow the cleaner to soak for a few minutes to break down grime and old lubricant.
  4. Scrub Thoroughly: Use the chain brush to scrub the chain vigorously, working your way around the entire length. Pay special attention to the areas between the links and the sprockets.
  5. Rinse Thoroughly: Rinse the chain with water or a hose to remove the chain cleaner and loosened grime.
  6. Degrease (Optional): If the chain is particularly dirty, you can apply a degreaser and scrub again before rinsing.
  7. Dry the Chain: Wipe down the chain with a clean rag or towel to remove excess moisture. Allow it to air dry completely before proceeding.
  8. Apply Chain Lube: Once the chain is dry, apply a thin, even coat of chain lube to the entire length of the chain. Refer to the manufacturer’s instructions for the proper application technique.
  9. Wipe Off Excess Lube: Use a rag to wipe off any excess lube, as this can attract dirt and debris.

effectively cleaning your motorcycle chain.

How Often Should You Clean Your Chain?

The frequency of chain cleaning depends on your riding conditions and habits. As a general rule, aim to clean your chain:

  • Every 500-1000 miles: For regular street riding.
  • After Every Off-Road Ride: If you ride in muddy or dusty conditions.
  • After Riding in the Rain: Rainwater can wash away lubricant and introduce contaminants.

Tips for Effective Chain Cleaning

  • Don’t Use High-Pressure Water: Avoid using a pressure washer or high-pressure nozzle on your chain, as this can force water into the seals and damage the chain.
  • Clean Regularly: Regular cleaning is more effective than occasional deep cleaning. A clean chain is easier to maintain and less likely to develop serious problems.
  • Choose the Right Lube: Use a chain lube that’s appropriate for your riding conditions and climate. For example, wet lubes are better for wet conditions, while dry lubes are preferred for dry and dusty environments.

Maintaining a Healthy Chain: Beyond Cleaning

In addition to regular cleaning, proper maintenance is essential for a long-lasting chain:

  • Check Chain Tension: Ensure your chain is properly tensioned according to your motorcycle’s owner’s manual.
  • Inspect for Wear: Regularly inspect your chain for signs of wear, such as stretched links, stiff links, or excessive slack. Replace your chain if you notice any significant wear.

While the standard cleaning process is sufficient for most maintenance, sometimes your chain may require a deeper clean. This is particularly true if it’s heavily soiled or hasn’t been cleaned in a while. Here’s how to tackle a deep clean:

effectively cleaning your motorcycle chain.

Removing Stubborn Grime with Degreaser

A degreaser is a powerful cleaner designed to dissolve grease, oil, and other stubborn grime. Here’s how to use it effectively:

  1. Apply Degreaser: Spray or apply the degreaser liberally to the entire chain, focusing on areas with heavy buildup.
  2. Let it Dwell: Allow the degreaser to sit on the chain for the recommended time, typically 5-10 minutes.
  3. Agitate: Use the chain brush to agitate the degreaser, loosening and lifting the grime.
  4. Rinse Thoroughly: Rinse the chain thoroughly with water to remove the degreaser and loosened grime.
  5. Repeat if Necessary: If any grime remains, repeat the degreasing process.

Precautions When Using Degreasers

  • Wear Gloves: Degreasers can be harsh on your skin, so always wear gloves when using them.
  • Protect Painted Surfaces: Avoid spraying degreaser directly onto painted parts of your motorcycle, as it can damage the finish.
  • Rinse Thoroughly: Ensure you rinse the chain completely to remove all traces of degreaser, as it can be corrosive to metal.

Using Kerosene or Diesel Fuel (Proceed with Caution)

Kerosene and diesel fuel are effective chain cleaners, but they must be used cautiously as they can be harmful to the environment and your motorcycle’s rubber components.

  1. Ventilation: Work in a well-ventilated area to avoid inhaling fumes.
  2. Containment: Use a drip pan or plastic container to catch the dirty solvent and prevent it from spilling on the ground.
  3. Protective Gear: Wear gloves and eye protection when handling kerosene or diesel fuel.
  4. Apply and Scrub: Apply the solvent to the chain and scrub with a brush, as you would with a dedicated chain cleaner.
  5. Rinse and Dry: Rinse the chain thoroughly with water and allow it to dry completely before applying lubricant.

When to Replace Your Chain

Even with meticulous cleaning and maintenance, motorcycle chains wear out over time. Here are signs that it might be time for a replacement:

  • Stretched Links: Measure the chain’s length according to your owner’s manual. If it exceeds the recommended limit, it’s time for a new chain.
  • Stiff Links: If you find it difficult to move the chain links freely, this could indicate wear and tear.
  • Excessive Slack: Too much slack in the chain can cause it to derail or break, posing a safety hazard.

effectively cleaning your motorcycle chain.

By following these cleaning and maintenance tips, you can ensure that your motorcycle chain stays in optimal condition, providing smooth power delivery, improved fuel efficiency, and a safer riding experience. Remember, a little effort goes a long way in preserving the life of your chain and keeping your bike running smoothly.

Choosing the Right Chain Lube

Chain lubes come in various formulations, each designed for specific riding conditions:

  • Dry Lube: Best for dry, dusty environments. It doesn’t attract much dirt and leaves a dry film on the chain.
  • Wet Lube: Ideal for wet or humid conditions. It’s more resistant to water wash-off but can attract dirt and grime.
  • Wax-Based Lube: Offers excellent protection and longevity but can be messy to apply.
  • O-Ring Safe Lube: Specifically formulated for O-ring and X-ring chains, ensuring proper lubrication without damaging the seals.
More Details
Jul 18, 2024
How Long Should You Charge a Motorcycle Battery?

A dead motorcycle battery can quickly turn your ride into a frustrating wait. But how long should you charge it to get back on the road? The answer isn’t always straightforward, as it depends on various factors. Let’s dive into the details, exploring battery types, chargers, and practical tips for optimal charging.

Factors Affecting Motorcycle Battery Charging Time

Several factors influence how long it takes to charge your motorcycle battery:

  • Battery Type: Lead-acid batteries (common in most motorcycles) generally take longer to charge than lithium-ion batteries.
  • Battery Size (Amp Hours): Larger batteries with higher amp-hour ratings naturally require more time to charge fully.
  • Charger Type and Amperage: Trickle chargers (low amperage) take longer than smart chargers or higher amperage chargers.
  • Depth of Discharge: A completely drained battery will take longer to charge than one that’s only partially depleted.
  • Battery Age and Condition: Older or damaged batteries may not hold a charge as efficiently, potentially extending charging times.
  • Ambient Temperature: Cold temperatures can slow down the charging process.

Types of Motorcycle Battery Chargers

Understanding different chargers helps you choose the right one for your needs:

Trickle Chargers

These deliver a low, steady current and are ideal for maintaining a battery’s charge over time. They’re not the fastest option for a dead battery.

Smart Chargers

These automatically adjust the charging current and voltage, preventing overcharging and optimizing battery life. They’re a good all-around choice.

Fast Chargers

These deliver higher amperage, charging your battery faster. However, they can generate heat and potentially shorten your battery’s lifespan if used excessively.

Estimating Charging Time for Different Battery Types

While precise times vary, here are general estimates:

  • Lead-Acid Batteries:
    • Trickle Charger: 6-24 hours (or longer)
    • Smart Charger: 2-8 hours
    • Fast Charger: 1-4 hours
  • Lithium-Ion Batteries:
    • Smart Charger: 1-4 hours

How to Charge Your Motorcycle Battery Safely

  1. Read Your Manual: Always consult your motorcycle and battery charger manuals for specific instructions and safety precautions.

  2. Disconnect the Battery: Remove the negative (-) terminal first, then the positive (+). This prevents accidental sparks.

  3. Choose the Right Charger: Select a charger compatible with your battery type and size.

  4. Connect the Charger: Connect the positive (+) charger lead to the positive (+) battery terminal, then the negative (-) lead to the negative (-) terminal.

  5. Monitor the Charging Process: Check the charger’s indicator lights or display to monitor progress. Don’t leave the battery unattended for extended periods.

  6. Disconnect and Reconnect: Once fully charged, disconnect the charger, then reconnect the battery terminals, positive (+) first, then negative (-).

Get the optimal charging time for your motorcycle battery

Signs Your Battery is Fully Charged

  • Charger Indicator: Most chargers have indicator lights or displays that show when the battery is fully charged.
  • Voltage Reading: Use a multimeter to check the battery voltage. A fully charged lead-acid battery should read around 12.6-12.8 volts.

Tips for Maintaining Your Motorcycle Battery

  • Regularly Charge: Don’t let your battery sit discharged for long periods. Use a trickle charger during storage or when the motorcycle is not in use.
  • Clean Terminals: Keep battery terminals clean and free of corrosion.
  • Check Electrolyte Levels (Lead-Acid Batteries): If your battery has removable caps, check the electrolyte levels and top up with distilled water if needed.
  • Ride Regularly: Regular riding helps keep your battery charged.

Understanding how long to charge your motorcycle battery is crucial for getting back on the road quickly and safely. Remember, it’s not just about time; it’s about using the right charger, following safety protocols, and maintaining your battery for optimal performance.

By following these guidelines, you’ll ensure your battery is always ready to power your next adventure!

Troubleshooting Common Charging Issues

Even with the best intentions, you might encounter some hiccups while charging your motorcycle battery:

  • Battery Won’t Charge: If your battery refuses to charge, double-check the connections to ensure they’re secure and clean. Also, inspect the battery for any visible damage. If the issue persists, the battery might be beyond its lifespan and require replacement.
  • Charger Gets Hot: Some warmth is normal, but excessive heat could indicate a problem with the charger or battery. Disconnect the charger immediately and let both cool down. If the issue continues, consult a professional.
  • Battery Overheats: If your battery becomes excessively hot while charging, disconnect the charger immediately. This could signify an internal issue within the battery.
  • Slow Charging: If charging takes significantly longer than expected, the battery might be nearing the end of its life or there might be a problem with the charger.

Extending Your Motorcycle Battery’s Lifespan

To get the most out of your battery and avoid unexpected breakdowns:

  • Store Properly: If you’re not using your motorcycle for an extended period, disconnect the battery and store it in a cool, dry place. Consider using a trickle charger to maintain its charge level.
  • Avoid Deep Discharge: Try not to completely drain your battery. If you notice your motorcycle struggling to start, charge the battery as soon as possible.
  • Ride Regularly: Frequent use keeps your battery healthy and prevents it from discharging too deeply.
  • Cleanliness: Regularly clean the battery terminals and connections to prevent corrosion, which can impede charging.

Get the optimal charging time for your motorcycle battery

When to Replace Your Motorcycle Battery

Despite your best efforts, all batteries eventually wear out. Here are signs your battery needs replacement:

  • Difficulty Starting: If your motorcycle struggles to start, even after charging, it could be a sign that your battery is no longer holding a charge effectively.
  • Dimming Lights: Dim headlights or other electrical issues can indicate a weak battery.
  • Leaking or Swelling: If you notice any leaks or swelling on your battery, it’s a clear sign that it needs to be replaced immediately.

Safety First: Charging Your Motorcycle Battery

Always prioritize safety when working with batteries:

  • Ventilation: Charge your battery in a well-ventilated area to prevent the buildup of hydrogen gas, which is flammable.
  • Eye Protection: Wear safety glasses to protect your eyes from battery acid or sparks.
  • Avoid Sparks: Be cautious when connecting and disconnecting the charger to avoid creating sparks that could ignite hydrogen gas.
  • Storage: Store your battery and charger in a cool, dry place away from flammable materials.

Charging Motorcycle Batteries in Different Climates

Temperature plays a significant role in battery performance and charging. Here’s how to adjust your approach based on the climate:

  • Cold Weather Charging: In colder temperatures, batteries tend to lose their charge faster. Use a charger specifically designed for cold weather conditions, as they can adjust the charging voltage to compensate for the lower temperature. Consider bringing your battery indoors to a warmer environment before charging if it’s extremely cold.
  • Hot Weather Charging: High temperatures can also stress batteries. Avoid charging your motorcycle battery in direct sunlight or excessively hot environments. Park your bike in a shaded area and allow the battery to cool down before charging.

Get the optimal charging time for your motorcycle battery

Advanced Battery Charging Technologies

Technology is constantly evolving, and so are battery chargers:

Pulse Charging:

This technology sends short bursts of current to the battery, which can help desulfate the plates and potentially extend the battery’s life.

Multi-Stage Charging:

These chargers use multiple charging stages (bulk, absorption, float) to optimize the charging process and protect the battery from damage.

Conclusion

Knowing how long to charge your motorcycle battery empowers you to keep your ride in top shape. By understanding the factors influencing charging time, using the right charger, and following safe practices, you’ll ensure a smooth and reliable riding experience.

Remember, a well-maintained battery is the heart of your motorcycle electrical system. Treat it well, and it will reward you with many miles of trouble-free riding.

More Details
Jul 12, 2024
Motorcycle Speed Demons: Unraveling the Need for Speed

The rumble of the engine, the wind whipping past your face, the thrill of acceleration – motorcycles are synonymous with speed. But just how fast can these two-wheeled machines go? The answer, as you might expect, isn’t so simple. What is the speed of a motorcycle? It’s a complex equation with various factors at play, each contributing to a bike’s top speed.

It’s All in the Engine: The Heart of Speed

First and foremost, the engine’s size and power play a crucial role. A 250cc bike, often favored by beginners, might top out around 85 mph, while a powerful 1000cc superbike can easily surpass 180 mph. It’s like comparing a family sedan to a Formula One car. The bigger the engine, the greater the potential for speed.

More Than Just Horsepower: Factors Influencing Speed

But horsepower isn’t the only factor influencing a motorcycle’s velocity. Aerodynamics, weight, gearing, and even the rider’s skill and body position can all affect how quickly a bike reaches its maximum speed.

Slicing Through the Air: The Role of Aerodynamics

Imagine trying to run through a pool of water versus air. You’d encounter more resistance in the water, right? The same principle applies to motorcycles. The more aerodynamic a bike, the less air resistance it faces, allowing it to reach higher speeds. Fairings (those sleek plastic coverings) and crouched riding positions are designed to reduce drag and boost speed.

Weight: A Balancing Act

Weight is another critical factor. Lighter bikes generally accelerate faster and can reach higher speeds than their heavier counterparts. However, a heavier bike might offer better stability at high speeds. It’s a trade-off between agility and stability.

Speed Limits: A Necessary Restraint

While motorcycles have the potential to reach breathtaking speeds, most riders adhere to legal speed limits on public roads. After all, safety is paramount. However, certain closed-course events, like professional racing, allow riders to push their bikes to the absolute limit.

Professional motorcycle racing is a testament to the incredible speeds these machines can achieve. In events like MotoGP, bikes regularly hit speeds over 200 mph. Even more astonishing are the land speed records set on specially designed motorcycles, some reaching speeds of over 376 mph.

Motorcycle Speed Demystified

Choosing the Right Speed: Matching Bike to Rider

Choosing a motorcycle with a speed that aligns with your skill level and intended use is crucial. A beginner rider on a superbike is a recipe for disaster. Start with a smaller, less powerful bike to gain experience and confidence before graduating to faster machines.

Remember, speed is exhilarating, but it also comes with risks. Always ride responsibly, wear protective gear, and be mindful of your surroundings. Speed thrills, but safety should always be your top priority.

The Human Element: Skill and Experience Matter

While a motorcycle’s specifications determine its potential speed, it’s the rider’s skill and experience that ultimately unlock that potential. A novice rider might struggle to handle a powerful bike at high speeds, while a seasoned rider can expertly maneuver a bike at its limits.

If you’re a new rider, start with a smaller, less powerful bike to hone your skills. Gradually work your way up to larger, faster machines as your confidence and abilities grow. Enroll in a motorcycle safety course to learn proper riding techniques and gain valuable experience in a controlled environment.

The Legal Landscape: Speed Limits and Restrictions

Motorcycles are subject to the same speed limits as other vehicles on public roads. Exceeding these limits is not only illegal but also incredibly dangerous. Remember, roads are shared spaces, and it’s essential to prioritize the safety of yourself and others.

If you crave the thrill of high speeds, consider participating in track days or amateur racing events. These controlled environments allow you to push your bike to its limits without endangering yourself or others on public roads.

While speed can be a thrilling aspect of motorcycling, it’s far from the only one. Many riders find joy in the freedom of the open road, the camaraderie of fellow riders, and the ability to explore new places.

H3: The Motorcycle Community

Motorcycling is more than just a mode of transportation; it’s a lifestyle. Joining a motorcycle club or group can introduce you to new friends, riding partners, and a sense of belonging. It’s a great way to share your passion for motorcycles and explore the world on two wheels.

Motorcycle Speed Demystified

Choosing Your Ride: Speed vs. Other Factors

When selecting a motorcycle, speed shouldn’t be the sole deciding factor. Consider your riding experience, intended use, and personal preferences.

A cruiser might be perfect for leisurely rides, while a sportbike is built for speed and agility. Adventure bikes excel off-road, while touring bikes offer comfort and storage for long journeys. Choose a bike that aligns with your individual needs and riding style.

While motorcycles are undeniably fast, speed is just one aspect of the riding experience. Whether you’re cruising down the highway, carving through twisty mountain roads, or exploring off-the-beaten-path trails, the joy of motorcycling lies in the freedom, adventure, and connection it offers. So, go ahead and experience the thrill of two wheels, but remember, ride responsibly and always prioritize safety over speed.

The Road Less Traveled: Motorcycle Adventures

While speed is certainly exhilarating, many motorcycle enthusiasts find deeper fulfillment in the journeys they embark upon. Motorcycles offer a unique way to experience the world, connecting riders with the environment and offering a sense of freedom and adventure.

From winding coastal highways to majestic mountain passes, motorcycles allow riders to explore breathtaking landscapes at their own pace. The open road becomes a canvas, and the journey itself becomes the destination.

Adventure Touring: Where the Pavement Ends

For those seeking even greater thrills, adventure touring motorcycles open up a world of off-road exploration. These rugged machines are built to tackle dirt tracks, gravel roads, and even challenging terrain, allowing riders to venture far beyond the confines of paved highways.

Motorcycle culture is rich and diverse, with a shared passion for speed and performance. Enthusiasts gather at rallies, track days, and motorcycle shows to celebrate their love for two wheels and exchange stories of thrilling rides and adrenaline-fueled adventures.

These events foster a sense of community and camaraderie among riders, offering opportunities to connect with like-minded individuals, learn new skills, and even compete in friendly races.

Motorcycle Speed Demystified

The Evolving Technology of Speed: Electric Motorcycles

The motorcycle industry is embracing the electric revolution, with new models offering impressive speed and performance while reducing emissions and environmental impact. Electric motorcycles are quickly gaining popularity among eco-conscious riders and those seeking a quieter, smoother ride.

As battery technology continues to advance, we can expect even faster and more powerful electric motorcycles in the future. These bikes are poised to redefine the concept of motorcycle speed, offering a sustainable and exhilarating way to experience the open road.

The Speed of a Motorcycle: A Multi-Faceted Concept

In conclusion, the speed of a motorcycle is not a single, definitive answer. It’s a complex interplay of factors, including engine power, aerodynamics, weight, rider skill, and the legal environment. But beyond the raw numbers, motorcycle speed is a visceral experience, a thrill that ignites the senses and fuels a passion for adventure.

Whether you’re a speed demon seeking adrenaline rushes or a casual cruiser enjoying the scenery, remember that motorcycling is about more than just how fast you can go. It’s about the freedom, the adventure, and the joy of the ride. So, choose the bike that suits your needs and riding style, and embrace the open road at your own pace.

More Details
Jul 10, 2024
Motorcycle Helmet Styles: Finding Your Perfect Fit

Motorcycle helmets aren’t just accessories; they’re crucial safety gear. However, the right helmet goes beyond protection. It should fit your riding style, personal preferences, and, let’s face motorcycle helmet styles, look good on you. Let’s break down the main styles:

Full Face Helmets: Maximum Protection

These helmets cover your entire head, including the chin, offering the highest level of protection.

Pros

Superior impact absorption, protects from wind, debris, and noise, often equipped with face shields for added protection from elements.

Cons:

Can feel bulky, less ventilation compared to other styles, can feel claustrophobic for some riders.

Ideal for: Sportbike riders, touring riders, commuters, and anyone prioritizing maximum safety.

Modular Helmets: Versatile and Convenient

Modular helmets (also known as flip-up helmets) combine the protection of a full-face helmet with the convenience of an open-face design. The chin bar and visor can flip up, allowing for easier communication and ventilation.

  • Pros: Versatile for different riding conditions, convenient for glasses wearers, improved ventilation compared to full-face helmets.
  • Cons: Heavier than other styles, can be less aerodynamic when the chin bar is flipped up.

Ideal for: Touring riders, adventure riders, and those who want the option of both open and full-face protection.

Open Face Helmets (3/4 Helmets): Classic Style with a Breeze

Open face helmets cover the top, back, and sides of your head but leave your face exposed.

  • Pros: Excellent peripheral vision, lightweight and comfortable, stylish and classic look.
  • Cons: No chin protection, less wind and noise protection than full-face helmets.

 Ideal for: Cruisers, vintage bike enthusiasts, and riders who prioritize a classic aesthetic and open-air feel.

Half Helmets: Minimalist Design, Maximum Freedom

Half helmets offer the least amount of coverage, protecting only the top of your head.

  • Pros: Lightweight and unobtrusive, maximum ventilation and airflow, easy to put on and take off.
  • Cons: Limited protection, no face or chin protection, not recommended for high-speed riding.

Ideal for: Casual riders, scooter riders, and those who prioritize a minimalist look and feel.

Explore Diverse Motorcycle Helmet Designs

Off-Road/Motocross Helmets: Built for Adventure

These helmets are specifically designed for off-road riding, with features like extended chin bars for protection against roost and ample ventilation for intense activity.

  • Pros: Excellent ventilation, lightweight, aggressive styling.
  • Cons: Not ideal for street riding due to limited visibility and noise, usually require goggles instead of a face shield.

Ideal for: Motocross riders, enduro riders, and anyone tackling dirt trails or rugged terrain.

Choosing Your Perfect Match: Style Meets Substance

Your ideal helmet depends on your riding habits, personal preferences, and desired level of protection. Consider motorcycle helmet styles:

  • Riding Style: Are you a daily commuter, a weekend cruiser, or an off-road adventurer?
  • Comfort: Does the helmet fit snugly without being too tight? Is it lightweight and comfortable to wear for extended periods?
  • Features: Do you need a built-in sun visor, Bluetooth connectivity, or specialized ventilation?
  • Style: Does the helmet’s aesthetic appeal to you? Do you want a classic look, a modern design, or something more unique?

Retro and Vintage Helmet Styles: A Nod to the Past

For riders seeking a nostalgic aesthetic, retro and vintage helmet styles offer a charming alternative.

  • Cafe Racer Helmets: These helmets boast a simple, minimalist design with a low profile and a snug fit. They often come in a variety of colors and finishes, from matte black to chrome.
  • Bubble Visor Helmets: Inspired by the helmets worn by pilots in the 1960s, bubble visor helmets feature a distinctive bubble-shaped visor that adds a retro flair.
  • German-Style Helmets: These helmets are known for their unique shape, with a pointed back and a short peak. They often have a vintage look and feel, making them popular among classic motorcycle enthusiasts.

While vintage-inspired helmets offer a stylish throwback, many are equipped with modern safety features like impact-absorbing liners and DOT certification, ensuring you’re protected while cruising in style.

Explore Diverse Motorcycle Helmet Designs

Custom Helmets: Express Your Individuality

If you want a helmet that truly stands out, consider a custom-painted helmet. Artists can transform your helmet into a unique work of art, incorporating your favorite colors, designs, or even portraits.

  • Airbrushing: This technique allows for detailed and intricate designs with a smooth finish.
  • Hand Painting: For a more personalized touch, consider hand-painted designs that showcase the artist’s unique style.
  • Vinyl Wraps: These wraps offer a durable and customizable option with a wide range of patterns and designs.

A custom helmet is more than just protective gear; it’s a canvas for self-expression. Let your creativity run wild and create a helmet that reflects your personality and passion for riding.

Helmet Accessories: Enhance Your Riding Experience

Upgrade your helmet with a variety of accessories to improve comfort, functionality, and style.

  • Bluetooth Communication Systems: Stay connected with fellow riders and take calls hands-free while on the go.
  • Helmet Cameras: Capture your adventures on the road with high-quality video footage.
  • Visor Inserts: Anti-fog and tinted visor inserts enhance visibility in different weather conditions.
  • Helmet Mohawks: Add a touch of fun and personality to your helmet with a colorful mohawk.

Helmet Laws: Ride Responsibly and Legally

Always check your local laws regarding helmet use. In many states, wearing a helmet is mandatory for all riders. Choosing a DOT-certified helmet ensures it meets minimum safety standards.

Your motorcycle helmet is more than just a safety device. It’s a part of your riding identity, a reflection of your style, and a statement of your passion for the open road. By choosing the motorcycle helmet styles and personalizing it to your liking, you can create a look that’s uniquely yours and enjoy every ride with confidence and flair.

Explore Diverse Motorcycle Helmet Designs

Smart Helmets: The Future of Head Protection

The motorcycle world is embracing technology, and helmets are no exception. Smart helmets are revolutionizing rider safety and experience.

  • Heads-Up Displays (HUDs): These project essential information like speed, navigation, and incoming calls directly onto the visor, keeping your eyes on the road.
  • Integrated Cameras: Record your rides in high definition, perfect for capturing memories or evidence in case of accidents.
  • Emergency SOS Systems: Automatically alert emergency services in the event of an accident, providing your location for faster response times.
  • Noise-Canceling Technology: Reduce wind noise and distractions, allowing for a more peaceful and focused ride.
  • Voice Commands: Control your music, answer calls, or get directions without taking your hands off the handlebars.

Smart helmets enhance safety and convenience for riders, offering a glimpse into the future of motorcycle gear.

Helmet Graphics and Decals: Personalizing Your Ride

Aside from custom paint jobs, adding graphics or decals is a popular way to personalize your helmet. From racing stripes to cartoon characters, the options are endless.

  • Reflective Decals: Enhance visibility at night for added safety.
  • Team Logos: Show your support for your favorite racing teams or brands.
  • DIY Decals: Create your own custom designs for a truly unique look.

Let your helmet be a reflection of your personality and passions. Whether you’re a minimalist or a maximalist, there are endless ways to customize your helmet to make it your own.

Helmet Care and Maintenance: Extending the Lifespan

Proper care and maintenance can significantly extend the lifespan of your helmet and keep it functioning at its best.

  • Cleaning: Regularly clean the exterior with mild soap and water and the interior with a helmet-specific cleaner.
  • Storage: Store your helmet in a cool, dry place away from direct sunlight.
  • Inspection: Check for cracks, dents, or other signs of damage after each ride. Replace your helmet if you notice any damage.
  • Replacement: Most manufacturers recommend replacing your helmet every 5 years or after a significant impact.

More Details
Jul 3, 2024
Exploring the Legacy of the Viper Engine Motorcycle

Motorcycles have long been symbols of freedom, speed, and engineering prowess. But when the power of a Viper engine motorcycle is introduced to this realm, it represents a monumental leap in motorcycle history. This article explores the legacy of the Viper engine motorcycle – a machine that merges the thrill of biking with the wild heart of one of the most iconic engines in automotive history.

The Viper Engine in a Two-Wheeled Marvel

Power and Performance Redefined

The idea of fitting the Viper’s V10 engine into a motorcycle chassis was nothing short of audacious. This engine, known for its use in the Dodge Viper, is a 8.0-liter behemoth capable of generating enormous power and torque. When integrated into a motorcycle’s framework, the result is a power-to-weight ratio that defies the limits of conventional biking experiences.

Engineering a Unique Ride

The Viper engine motorcycle is not just about raw power; it is also an ode to engineering brilliance. Adapting such a powerful engine to suit the dynamics of a motorcycle demands extensive customization and a deep understanding of both automobile and motorcycle mechanics. The teams behind these bikes must ensure that the structural integrity, balance, and handling can cope with the monster engine’s output.

motorcycle with viper engine

The Viper Engine Motorcycle in Pop Culture

A Symbol of Extreme Performance

This motorcycle quickly gained a cult status among enthusiasts and in pop culture as a symbol of extreme performance. Its appearance and specifications often made it the centerpiece of motorcycle shows and auto expos, drawing crowds eager to see the unusual amalgamation of a muscle car engine mounted on a two-wheeler.

Innovation and Imagination on Display

The Viper engine motorcycle served as a showcase of what happens when innovation meets imagination. It stands as a testament to the advancements in mechanical engineering and pushes the boundaries of what is possible in the world of custom bike building.

Handling and Responsiveness

Mastering the Power Delivery

Riding a motorcycle with a Viper engine is an unparalleled experience. The challenge lies in the bike’s ability to handle and respond to the immense power surging through its frame. It requires a rider with skill and guts to tame and harness the full potential of such a machine, making it a true test of ability and courage.

Safety and Control at High Speeds

Handling such a machine is not just about speed; safety and control are paramount. Modifications must include high-performance brakes, advanced suspension systems, and electronics that help manage the engine’s output. Without these, the bike would be impractical for road use and too dangerous even for experienced riders.

motorcycle with viper engine

The Impact on Future Motorcycle Design

Paving the Way for Innovation

The creation of the Viper engine motorcycle opened a new chapter in bike design and customization. The technology and techniques developed to make this machine viable have paved the way for future innovations in the industry, influencing how engineers approach powertrain integration and overall bike performance.

Applications of Viper Tech in Modern Motorcycles

Modern motorcycles have benefitted from the pioneering spirit of the Viper engine motorcycle. The lessons learned in terms of power management, thermal dynamics, and material strength have found applications in today’s high-performance motorcycles, making them faster, stronger, and more exhilarating to ride.

The Continued Enthusiasm for Viper-Powered Bikes

The Community of Viper Motorcycle Aficionados

Despite its niche appeal, the Viper engine motorcycle has a passionate following. Enthusiasts and collectors appreciate the rarity and bold statement these bikes make. Communities and forums dedicated to the care, maintenance, and showcasing of these bikes have helped to preserve the legacy and the vibrant history behind them.

Ensuring the Legend Lives On

For the legend of the Viper engine motorcycle to continue, it requires a commitment from both owners and the wider biker community. Maintaining such specialized machines demands resources and passion. However, with a continued interest in the blend of iconic American power and the rebellious spirit of motorcycling, this extraordinary vehicle’s legacy is set to live on.

motorcycle with viper engine

Viper Engine Motorcycle’s Inception

Creating a Mechanical Marvel

Merging a Dodge Viper’s 8.0-liter V10 engine with a two-wheeled vehicle was an ambitious task. It blurred the traditional boundaries between car and motorcycle. The motivation to build the Viper engine motorcycle originated from a desire to accomplish something never before seen. It aimed to create a functional motorbike equipped with the heart of one of the most powerful American engines.

A Bold Vision Realized

The individuals who first envisioned and built the Viper engine motorcycle were more than just mechanics or engineers. They were true visionaries. Their process involved trial and error, as well as relentless innovation. They successfully coupled the engine with a custom-built chassis. This chassis was designed to handle the engine’s incredible torque and horsepower. Their efforts gave birth to an entirely new breed of motorcycle.

Elevating Performance Standards

Redefining Power on Two Wheels

The Viper engine motorcycle didn’t just push the envelope; it tore it open. It set new performance standards, challenging manufacturers and custom builders to rethink the capabilities of a motorcycle. The sheer velocity and raw energy offered by this motorcycle made it an icon of power and a benchmark for future performance enhancements in the industry.

The Thrill of Ultimate Speed

For the daredevils and speed junkies, the Viper engine motorcycle provided an unparalleled adrenaline rush. Its ability to unleash the full fury of the V10 with a twist of the throttle translated to an electrifying riding experience that remains etched in the memories of those fortunate enough to control its reigns.

The Design and Aesthetic Appeal

Striking Appearance Meets Functionality

The Viper engine motorcycle’s design is as much about functionality as it is about aesthetic appeal. The prominent motor became a central visual element, with the bike’s bodywork designed to flaunt the engine while ensuring aerodynamic efficiency. Its white-knuckle performance was matched by a look that turned heads and stirred souls.

Staying True to a Unique Identity

Integrating the colossal engine into the motorcycle necessitated significant structural changes. Builders strived to balance the Viper’s identity with the ergonomic requirements of a motorcycle. The outcome was a distinctive appearance. This look preserved the character of both the engine and the motorcycle platform it was mounted on.

Impact on Custom Motorcycle Culture

Inspiring a Wave of Custom Builds

The audaciousness of the Viper engine motorcycle inspired a wave of custom builds. This influence permeated the biker community, motivating amateur and professional builders alike to push past traditional customizing norms and explore the limits of their creativity and mechanical prowess.

The Hallmark of Bespoke Engineering

As a hallmark of bespoke engineering, the Viper engine motorcycle became a symbol within the custom motorcycle culture for those looking to make a personal statement with their machines. It epitomized the ultimate fusion of art, form, and high-octane function in the realm of two-wheeled transport.

Challenges and Complexities

Navigating the Technical Challenges

Building a motorcycle around the Viper’s V10 was nothing short of an engineering odyssey, replete with technical challenges. Builders had to ensure that the bike was not just fast but also rideable. This required custom-built components, innovative solutions to weight distribution and handling, and a constant focus on rider safety.

The Complexities of Control

Controlling such ferocious power on two wheels demanded unprecedented measures. Advanced braking systems, finely tuned suspensions, and electronic aids were just some of the imperative features implemented to ensure that the motorcycle could be ridden safely and effectively.

The Future of High-Performance Motorcycles

The Continuing Evolution

The Viper engine motorcycle is a rare and extreme example of high-performance biking. Yet, its spirit endures in the ongoing evolution of these types of motorcycles. It serves as a beacon of what can be achieved. With visionary thinking and technological sophistication, motorcycle performance has a future full of endless possibilities.

Electric Power and Beyond

The quest for speed is reaching new milestones in the motorcycle industry due to electric power and improving battery technologies. Despite these advancements, the legacy of the Viper engine motorcycle remains influential. It suggests that there will always be room for innovative thinking in this industry. Groundbreaking machines will continue to provide unparalleled riding experiences.

Remembering the Viper Engine Motorcycle

The Enthusiast Community’s Role

The enthusiast community plays a critical role in preserving and sharing the story of the Viper engine motorcycle. It’s through gatherings, exhibitions, and online forums that the knowledge, passion, and admiration for this iconic machine carry on from one generation of bikers to the next.

An Iconic Chapter in Motorcycling History

The Viper engine motorcycle occupies an iconic chapter in motorcycling history. It symbolizes the zenith of nerve and skill in motorcycle craftsmanship and continues to be celebrated as a bold exemplar of what happens when convention is cast aside in the pursuit of earth-shaking speed.

The legacy of the Viper engine motorcycle stands as an impressive milestone in the world of motorcycling. It is a testament to the courage and creativity of those who dared to dream big and challenge the norm. Looking back on this remarkable creation, we are inspired by its journey. The journey showcases the boundless possibilities in high-performance motorcycles. The ever-evolving narrative of these motorcycles holds great potential. The Viper engine motorcycle has achieved ground-breaking speed. It also boasts an unmistakable presence. It will forever stand as an emblem of extreme engineering. Additionally, it serves as a beacon for future innovations in 2024.

More Details
Jun 28, 2024
Are half helmets as safe as full helmets? A Safety Showdown

Are half helmets as safe as full helmets? For some riders, half helmets (also called “beanie helmets”) hold a certain allure. They offer:

  • Lightweight Feel: Less bulk and weight than full helmets, which can be appealing for those who ride in hot weather.
  • Increased Visibility: Half helmets provide a wider field of vision compared to full helmets, allowing for better peripheral views.
  • “Cool Factor”: Let’s be honest, some riders simply prefer the classic, minimalist aesthetic of a half helmet.

While half helmets offer certain advantages, their safety comes into question when compared to full helmets.

Full Helmets: The Gold Standard in Protection

Full-face helmets cover your entire head, including your chin and jawline. This design provides the most comprehensive protection in the event of an accident.

Impact Protection:

Full helmets absorb and distribute impact forces more effectively, reducing the risk of head and facial injuries.

Abrasion Protection:

The chin bar of a full helmet shields your face from road rash and debris, which can be especially dangerous at high speeds.

Wind and Noise Reduction:

Full helmets create a quieter, more comfortable riding experience by blocking out wind noise and buffeting.

Safety Comparison: Half Helmets vs. Full Helmets

Studies consistently show that full helmets offer superior protection compared to half helmets. For example, a study published in the Journal of Trauma and Acute Care Surgery found that full-face helmets were associated with a lower risk of head injury compared to half helmets.

Half Helmets: The Risks

While half helmets meet basic safety standards, they leave your face and jaw vulnerable in a crash.

  • Facial Injuries: Half helmets offer no protection for your chin, jaw, or face, increasing the risk of fractures and lacerations in an accident.
  • Dental Trauma: A fall or collision can easily result in broken teeth or jaw injuries when wearing a  helmet.
  • Eye Injuries: Debris kicked up by other vehicles can cause eye injuries due to the lack of facial protection.

According to the National Highway Traffic Safety Administration (NHTSA), motorcyclists wearing half helmets are three times more likely to suffer head injuries than those wearing full helmets.

Making an Informed Decision: Which Helmet is Right for You?

Choosing a helmet is a personal decision, but safety should always be a top priority. Consider these factors:

  • Your Riding Style: If you primarily ride at low speeds in urban environments, a half helmet might seem appealing. However, even a low-speed crash can result in serious injuries.
  • Your Risk Tolerance: Are you willing to accept the increased risk of facial and head injuries associated with half helmets?
  • The Law: Some states have helmet laws that mandate the use of DOT-approved helmets. Check your local regulations before choosing a helmet.

A Compromise: Modular Helmets

If you like the openness of a half helmet but still want the option of full-face protection, a modular helmet might be a good compromise. These helmets feature a chin bar that can be flipped up when desired, providing the best of both worlds.

Ultimately, the safest choice for motorcycle riders is a full-face helmet. While half helmets offer some benefits, the protection they provide simply doesn’t compare to the comprehensive coverage of a full-face helmet.

By choosing a full-face helmet, you’re not only protecting yourself but also your loved ones who would be devastated by a preventable injury. Remember, your head is worth protecting.

Beyond Half and Full: Other Helmet Options

While half and full helmets are the most common choices, there are other helmet styles worth considering:

  • Open-Face (Three-Quarter) Helmets: These helmets offer more protection than half helmets, covering the top, back, and sides of your head, but leaving your face exposed. They’re a popular choice for riders seeking a balance of protection and visibility.
  • Modular Helmets: Also known as flip-up helmets, these offer the protection of a full-face helmet with the convenience of an open-face design. The chin bar can be flipped up when you want more airflow or a wider field of vision.
  • Dual-Sport Helmets: Designed for both on- and off-road riding, these helmets offer a combination of full-face protection with a visor that can be flipped up. They often have enhanced ventilation for comfort during strenuous rides.

Ultimately, the best helmet is the one that you’ll wear consistently and that provides the level of protection you need for your riding style and preferences. Don’t hesitate to try on different helmets and ask for advice from experienced riders or motorcycle gear specialists.

Helmet Fit and Comfort

Are half helmets as safe as full helmets? Choosing the right type of helmet is only half the battle. It’s crucial to ensure a proper fit for optimal safety and comfort.

  • Snug but Not Tight: Your helmet should fit snugly around your head without feeling too tight or causing pressure points.
  • No Shifting: The helmet should not move or shift when you shake your head.
  • Chin Strap Secure: The chin strap should be fastened securely, with no more than two fingers of space between the strap and your chin.

Always try on a helmet before purchasing it to ensure a proper fit. Consider visiting a motorcycle dealership or specialty store where you can get expert advice and try on different models.

Taking Care of Your Helmet

To maintain your helmet’s protective qualities:

  • Clean Regularly: Wipe down the exterior with a damp cloth and mild soap. Clean the interior with a helmet-specific cleaner or disinfectant.
  • Store Properly: Store your helmet in a cool, dry place away from direct sunlight. Avoid storing it on its side, as this can damage the inner lining.
  • Replace When Necessary: If your helmet has been involved in a crash, even a minor one, replace it immediately. Helmets are designed to absorb impact, and even if there’s no visible damage, the structural integrity may be compromised.

A Final Word on Safety

Are half helmets as safe as full helmets? Remember, a helmet is your first line of defense in a motorcycle accident. Investing in a high-quality, well-fitting helmet can mean the difference between a minor scrape and a life-altering injury.

It’s crucial to remember that helmets are not just accessories; they are essential safety gear that can save lives. Regardless of the style you choose, a helmet’s primary function is to protect your head from impact, reducing the risk of traumatic brain injury (TBI) in an accident. TBIs can have devastating consequences, including cognitive impairment, paralysis,

More Details
Jun 26, 2024
What motorcycle helmet is the safest?

A motorcycle helmet is the most important piece of safety gear for any rider. It protects your head in the event of a crash, and choosing the right one is crucial. What motorcycle helmet is the safest? This article will provide information to help you find a helmet that offers the best protection for your head, but we recommend consulting a motorcycle safety expert to get a personalized recommendation.

Helmet Safety Standards

Helmets sold in the United States must meet safety standards set by the Department of Transportation (DOT) or the Snell Memorial Foundation. Both DOT and Snell offer rigorous testing procedures to ensure helmets provide adequate impact protection.

DOT certification:

The DOT standard is the minimum safety requirement in the United States. A DOT-approved helmet will have a DOT sticker on the back.

Snell certification:

Snell certification is generally considered to be more stringent than DOT certification. Snell certification may be required for some motorcycle racing organizations. A Snell-approved helmet will have a Snell sticker on the back.

Types of Motorcycle Helmets

There are several different types of motorcycle helmets, each with its own advantages and disadvantages. Here’s a breakdown of the most common types:

  • Full-face helmets: Offer the most protection, covering the entire head, face, and jaw. Ideal for all riding styles, especially high-speed riding.
  • Modular helmets: Also known as flip-up helmets, these helmets have a chin bar that can be lifted up, transforming them into an open-face helmet. They offer more versatility than full-face helmets but less protection with the chin bar raised.
  • Open-face helmets: Expose the face and often lack a chin bar. Offer less protection than full-face or modular helmets, but provide more ventilation and a wider field of view. Suitable for low-speed riding, but not recommended for highway riding.
  • Dual-sport helmets: Designed for both on-road and off-road riding. Often have a visor and a peak to shield the rider from the sun and debris.

Find the Safest Motorcycle Helmet

Choosing a Helmet That Fits

A properly fitting helmet is essential for safety. A helmet that is too loose could come off in a crash, and a helmet that is too tight could be uncomfortable and distracting while riding.

Here are some tips for getting a good helmet fit:

  • Measure your head: Wrap a tape measure around the widest part of your head, just above your eyebrows.
  • Try on different helmets: Find a helmet that feels snug but comfortable. The helmet should not move excessively when you shake your head.
  • Check the cheek pads: The cheek pads should make gentle contact with your cheeks.
  • Check the visor seal: The visor should seal against the helmet opening to prevent wind noise and debris from entering.

Remember: If you ever feel discomfort while wearing a helmet, take it off and re-evaluate the fit. A properly fitted helmet should be comfortable and secure.

Additional Features to Consider

Once you’ve found a helmet that fits well and meets the necessary safety standards, you can consider additional features:

  • Visor: Choose a visor that offers a clear, undistorted view and provides UV protection. Consider a scratch-resistant visor for added durability.
  • Ventilation: Good ventilation is important for comfort, especially in hot weather. Look for helmets with vents that can be opened and closed to control airflow.
  • Liner: The helmet liner should be comfortable and removable for easy cleaning.

Replacing Your Motorcycle Helmet

Motorcycle helmets should be replaced every 5-7 years, or sooner if they have been in a crash or dropped. Even if a helmet looks undamaged after a crash, it may have sustained internal damage that could compromise its effectiveness in a future crash.

Finding the Right Motorcycle Helmet: Fit is King

A motorcycle helmet is the most important piece of safety gear for any rider. It protects your head in the event of a crash, and choosing the right one is crucial. This article will provide information to help you find a helmet that fits you well, which is essential for safety.

Why Does Helmet Fit Matter?

A properly fitting helmet is essential for safety. A helmet that is too loose could come off in a crash, and a helmet that is too tight could be uncomfortable and distracting while riding. If a helmet comes loose during a crash, it won’t be able to protect your head as effectively. An uncomfortable helmet can make it harder to focus on the road.

Getting a Good Helmet Fit

Here are some tips for getting a good helmet fit:

  • Measure your head: Wrap a tape measure around the widest part of your head, just above your eyebrows.
  • Visit a motorcycle gear store: The staff at a motorcycle gear store can help you find a helmet that fits well and answer any questions you have.
  • Try on different helmets: Different brands and models of helmets may fit differently. Try on several helmets to find one that feels snug but comfortable.
  • The cheek pad test: The cheek pads should make gentle contact with your cheeks. You should be able to fit a few fingers between the pads and your cheeks.
  • The visor seal test: The visor should seal against the helmet opening to prevent wind noise and debris from entering. Close the visor and try to move it side-to-Transkrypt side. There should be minimal movement.

Remember: If you ever feel discomfort while wearing a helmet, take it off and re-evaluate the fit. A properly fitted helmet should be comfortable and secure.

Additional Tips for Choosing a Helmet

Once you’ve found a helmet that fits well, here are some additional tips:

  • Look for a helmet with a DOT or Snell certification. These certifications mean that the helmet has met certain safety standards.
  • Choose a helmet with a visor that offers a clear, undistorted view. Consider a scratch-resistant visor for added durability.
  • Make sure the helmet has good ventilation. This is important for comfort, especially in hot weather.

Conclusion

Choosing the right motorcycle helmet is an important decision. By following these tips, you can find a helmet that fits well and offers the best protection for your head. Remember, safety comes first when riding a motorcycle. Ride safe!


More Details